
Hey, everyone! When I posted last week about my trying first day with my new Silhouette Cameo, I had a request to do a tutorial on how to use use it. So, I thought I would show you how I use Lettering Delights SVGs with my Silhouette Cameo.

First, I need to let you know that I purchased the Silhouette Studio Designer Edition software so using SVG files with my Cameo would be easier. As far as I know, Make-the-Cut (which I love), is not yet compatible with the Cameo, unless they've come out with an update in the past week or so that I don't know about (which is entirely possible). I'm sure they are working on getting MTC fully functional with the Cameo. I was itching to use my Cameo, though, and I really wanted to use the Lettering Delights SVGs that I just can't seem to stop collecting. So, purchasing the Silhouette Studio Designer Edition for $50 was a no-brainer for me.

I also want to say that I am, in no way, shape, or form, an expert at this. I'm just sharing with you how I figured out to use my SVGs with this software. There may be better, more efficient ways, but I'm just sharing my way.
Okay, now on to the tutorial. By the way, I'm working in Windows 7.
Step 1: Open the Silhouette Studio Designer Edition software on your computer. Once it is open, go to File--Open in the upper left hand corner of your screen. You can also click on the open folder in the upper left corner.

Step 2: In the window that appears, change the "Files of Type" to SVG.

Step 3: Locate the SVG file you want on your computer, click on it, and click OK.

This is what your screen will look like if you just imported a Lettering Delights SVG file. Other SVG files may be laid out differently on your screen and they may or may not be colored.

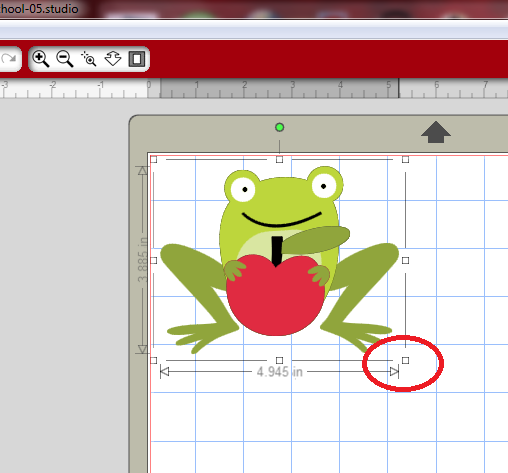
Step 4: Now, you want to size the image. First, click on the image to make it active. Measurements will appear around the image.

Then, Click on the lower right "handle" and drag until the image is the size you want.
Step 5: Now, you'll need to break the image into its separate cuts. Make sure the image is still active (with the measurements around it). Then, in the lower left corner of your screen, click the "Ungroup Selected Shapes" button.

Your image should now look like this. Notice that each little piece is surrounded by its own rectangle.

Step 6: Now it's time to separate the cuts on your virtual mat. First, click anywhere off of the image to deselect it. Then, click on each individual piece and drag it to a new place on your mat. The pieces will be grouped by color, which makes it easier for you!

Step 7: Now, you need to make these images cuttable. First, you need to select all of your shapes to make them active. You can do this by holding down the Ctrl key on your keyboard and typing A. This selects all of the shapes. You can also click and drag to select the entire mat. You'll know the shapes are all selected and active because they will each by surrounded by a rectangle.

Step 8: In the top right corner of your screen, you'll see a row of buttons. When you let your cursor hover over each one, a short description of each button's function will appear. Locate the "Open the Cut Style Window" button, and click on it.

On the right side of your screen, you'll see that "No Cut" is highlighted. You want "Cut Edge" to be highlighted, so click on it. You'll see a red outline appear around your images. If this photo is too small, just click on it to see it larger.

Step 9: Now it's time to prepare to cut! Yay! Cut the desired colored cardstock for your cuts to the appropriate size. You can use the grid marks on your Silhouette mat to help you with that. Also, remember that the mat loads from the top of your workspace, not the left like on the Cricut (if you're familiar with the Gypsy).

Step 10: Connect your Cameo to your computer with the provided USB cable, and turn on your machine. Load the mat into your machine (you can find instructions on how to do that in the guide that came with your machine).

Step 11: Now, click on the "Send to Silhouette" button in the upper left hand corner of your screen. If this photo is too small, just click on it to see it larger.

You will see that the sidebar on the right of your screen brings up the "Send to Silhouette" dialog box. You'll want to double check your cut settings, so click on the "Cut Settings" link. If this photo is too small, just click on it to see it larger.

Choose the type of paper you are using from the menu. (Click on the photo to make it larger). I chose cardstock, since that's is what I'm using. The software will now suggest what setting you should set your blade to. I would recommend not paying too much attention to this. I tried cutting cardstock with my blade set at 3, and it only cut through the thinner pieces.

In fact, the user guide that comes with the Cameo gives different settings. If this photo is too small, just click on it to see it larger. You see...I AM using textured cardstock (from Bazzill and American Crafts), so I should be using a setting from 4-6. I decided to use 5.

If you don't know how to adjust your blade setting, there are great instruction in your user guide:

You can also adjust Speed and Thickness on this screen, but I didn't bother with that just today. Once you have your cut settings like you want them, click "Send to Silhouette" at the bottom of the screen.
Step 12: Finally, it's time to cut! To do that, you just have to click on "Cut Page". Then, the magic begins!

And here's how beautifully my Cameo (with its blade set at 5) cut through my Bazzill and American Crafts textured cardstock. Just LOVELY!

Well, I hope you found my little tutorial helpful. I know that seems like a lot of steps, but I just wanted to give as much detail as possible to make this easier for you. And, really, once you try this a couple of times, it will seem so easy peasy! I'll be sharing the card I made with all of these cuts a little later in the week, so check back to see it!
Thanks so much for stopping by today!

Oh thank you Lisa, this was very helpful, I had been debating about buying this software, your tutorial has helped a lot!
ReplyDeleteStop by my blog today, I am Guest Designer for 3 Girl Jam and they have given me some candy to give away!
www.chrissandlou.blogspot.com
Thanks, have the software and didnt know how to use it!
ReplyDeleteThat is amazing!!! I have been thinking about getting one of these but I am afraid to learn a new program and machine, this looks awesome!!!
ReplyDeleteI have just upgraded to the Cameo fro the SD. They are fab machines. There are many sites where you can download free GSD/studio files. Have a look at UKscrappers site and go to the craft Robo/Cameo section of the forums.
ReplyDeleteExcellent tutorial, Lisa! Thank you so much. I love my Cameo, too!
ReplyDeleteThank you so much!! You just saved me so much aggravation!! :)
ReplyDeleteThis comment has been removed by the author.
ReplyDeleteThanks so much for all this ifo... it has really helped answer alot of questions... wish I had found this a week ago.. AND THANK YOU... i just read your ABOUT ME... the sacrafices our Military make and some don't think about what the families go through and the sacrafices they make as well... my nephew just returned home from Iraq!!! God Bless you and your family :))
ReplyDeleteHi Lisa - unless I'm thinking of something else (and it is enirely possible), when you first separate all of the parts of the file to cut, if you put the registration marks on the page, you can actually put a white sheet of paper through your printer, pop the white sheet on your mat (it has to be in the same place as your virtual mat), then cut, you have a way of print and cut rather than using different coloured card stock patchworked on your mat. I haven't tried this, but I thought this was the principal of the SVG - it becomes a print and cut file when separated. I could be wrong though.
ReplyDeleteI'm going to give it a try and check out my theory.
Paula
pmgale(at)sky(dot)com
I am part of the Silhouette Cameo Paper Crafts FB group too.
You are correct...you could use the SVG file as a print and cut file. I wanted to use colored card stock to create a paper pieced project, though...that's what I like creating the most. So, SVGs are good for both printing/cutting and just cutting. I prefer to cut from different colors of card stock most of the time. :)
Deletejust had a thought - googly stick on eyes would be great on this project - you know the ones that you can buy that move about... just a thought!!
ReplyDeletePaula :O)
xxx
Do you only get the option for SVG files on the upgraded version of the silhouette studio? I have just bought a cameo, still trying to figure it all out?
ReplyDeleteYes, SVGs can only be used on the Silhouette Studio Designer's Edition. I think it's worth the $50, though, since you have so much more flexibility with what kind of files you can find. There are so many SVGs out there that you can use.
DeleteI was considering buying a Silhouette Cameo and was wondering if you can use SCAL3 for the SVG files?
ReplyDeleteWow, thanks this is very clear instructions. I have a bunch of SVG's from back when Cricut would cut them. I'm so happy with the Cameo, that I have put the cricuts on craig's list.
ReplyDeleteLisa thanks so much for this someone had just shared this with me I was lucky enough to have the cameo sent to me as a gift from my dear friend Theresa the Scrapbooking Queen she is just the most sweetest lady can you pm me so I can ask you a few little questions
ReplyDeletethanks and hugs
Debbie
Thank you very much. I spend good few hours to find out how to cut svg file.
ReplyDeleteI have found it here.
This is fantastic! :) Janis
ReplyDeleteHi girls! I lost my installation cd with Designer Studio software.
ReplyDeleteDo you know if I can order it with data from my purchase, or if I have to buy it again? because who sold it (by Amazon) to me will not give me another copy... i change my old pc to a new Mac and need to install again. Thanks for your help!
Thank you for the tutorial! I printed it to help me remember thing! I just ordered the DS on disk!
ReplyDeleteThank you so much Lisa. I'm still a newbie at all of this with the Silhouette Cameo. I had a cricut but barely used it because I hated spending 30-100 per cartridge so it sat unsed for the past year. Read up on the Silhouette and hubby was kind enough to surprise me with one. Also happy you used different color card stock for this tut, since I have scads left from the cricut. Keep up the great tuts please!!!!
ReplyDeleteLisa, thanks for this great tutorial. Love the step by step.
ReplyDeleteGreat instructions - you totally simplified everything for me! Thanks!
ReplyDeleteThank you for taking the time to help others learning to use the silhouette cameo.
ReplyDeleteThank you for taking the time to help others learning to use the silhouette cameo.
ReplyDeleteVery very good interactions. You are great at explaining things! I will save this for sure. Thank you.
ReplyDeleteI have seen a lot of tutorials - This one is awesome!! Great job!!
ReplyDeletegracias yo trngo la cricut espero un dia poder comprar la cameo
ReplyDeleteabrazos
thank you so much for taking the time for this information very helpful indeed, I ordered a machine but havent got it yet just trying to see how to work it and this explains it pretty much. hugs
ReplyDeleteDo you know if the complete svg can be printed on heat transfer paper and applied to a t shirt...instead of in layers?
ReplyDeleteHi Lisa, Thank you for this tutorial. I am considering buying the Cameo and was doing a little research when I clicked on your site. I currently have a Cricut Expression which I can still use SCAL2 to cut my SVGs with and was looking for a machine that is compatible with my SVGs on my computer. Your tutorial is wonderful and I think has made my mind up!!
ReplyDeleteI am so disappointed in myself. I have had and love my Silhouette design edition for two years. Use it all the time!!! and NEVER thought of this! LOL Thank You. Kade
ReplyDeleteMultiple sheets and colours. BRILLIANT. I feel so stupid for not thinking of this. All my cards just got WAY FASTER to make haha!
ReplyDeletehttp://partnparcelstudio.com/
Thank you! Such a great idea. My reaction: Get the (bleep) outta here, I never thought of that! I intend to try this...today! Very exciting, thanks again!
ReplyDeleteSuper tutorial.. I am going to give it a try later today. I was sure there had to be an easier way to cut different colors at once.
ReplyDeleteHi Lisa! You probably won't see this comment as it's so long since you've posted but just wanted you to know I found you and this extremely useful tutorial via Pinterest. Can't thank you enough for the detailed steps. The software's probably long been updated also but I'll go check that out too. I'm off to explore your blog now...
ReplyDeleteMegan H (Australia)