Tuesday, November 29, 2011

Three French Hens

Happy Wednesday, everyone!  It's my Pink By Design day, and I have a fun card to show you today.  We're doing a 12 Days of Christmas series over at PBD, and my card was inspired by the Third Day of Christmas: Three French Hens.  Here it is:


This card measures 5" x 7".  I got these cute little hens from Silhouette's Online Store, their berets came from the Lettering Delights Hipsters Cut It Set, the Eiffel Tower came from the Lettering Delights J'adore SVG Set, and the wreath came from the Lettering Delights Christmas Dee-Licious SVG Set.  I cut all these shapes with my Silhouette Cameo, inked and assembled the pieces, and added brads for the hens' eyes.

I had a lot of fun with background stamps on this card.  First, I used the Pink By Design Damask Background Stamp to create the overall background for my card.  I decided to stamp right on my card base, but I wanted to contain the design to the front of the card.  So, I used good old painter's tape to mask off along the fold of the card. Then, I inked up my stamp by dabbing my stamp pad all over the stamp.


My background was bigger than the stamp, but that was no problem.  The great thing about PBD backgrounds is that they are totally tileable, which means I was able to stamp once, then line up the edge of the design and stamp again to cover the entire background.  When I was done, I carefully peeled off the painter's tape to reveal a perfectly clean line.  You know, this looks just like some wallpaper we had in our entry hall when I was growing up..green color and all.  smiley  Anyway, I wanted a more subtle background with less contrast, so I used my Colorbox Fluid Chalk inks to add a little distressing and character.


Next, I decided to use my Pink By Design Script Background Stamp to add a little pattern to some of my cut pieces.  


Then, I decided to soften the stamped images and papers a little by inking them with my Colorbox Fluid Chalk Inks:


Finally, I cut this cute little tag using the Pink By Design Goodie Label Die, which came with my November Stamp of the Month set (Goodie Labels).  This die was so easy to use with my Cuttlebug machine...here's how I did it:


In order to use steel dies like the ones you can find at PBD with your Cuttlebug, you need to purchase a Thin Die Adapter plate (Plate C).  I found mine online. Then, you want to make a "sandwich" in this order (from bottom to top):  A plate (on the bottom), C plate, die (with raised cutting edge facing up), cardstock, B plate.  Then, just run the "sandwich" through your Cuttlebug machine, and you have a perfect little tag that is ready for stamping! 


I used my Goodie Labels Stamp Set to outline the tag, then I stamped a sentiment from the PBD Old Time Christmas Stamp Set.  


 I added a little ribbon (which I also inked with my Fluid Chalk), and my little card was all done!  I hope you like it!  I'd love it if you'd leave me some love...I soooooo enjoy your comments. :)

Make sure to check out Pink By Design tomorrow to see what's in store for the Fourth Day of Christmas.  Have a great day!


Wednesday, November 23, 2011

WINNERS!!!!!!!!!!!!

Guess what!!!!  Today is the day!  I have 3 winners of Pink By Design gift certificates to announce.  Without further ado, here they are:

The winner of the $10 Gift Certificate to Pink By Design is:

Congrats, Debbie! 


The winner of the $15 Gift Certificate to Pink By Design is:

Congratulations, Hopefulcrafter!


And, the winner of the $25 Gift Certificate to Pink By Design is:

Congrats, Tami!


I'll be letting Mr. Pink know that you guys are winners, and he should be contacting you shortly. :)  Congratulations, you guys!

I hope everyone has a wonderful Thanksgiving tomorrow! 


Sunday, November 20, 2011

I am Thankful For You & a GIVEAWAY!!!

Hey there, everyone!  I hope you're having a wonderful weekend.  I made a little card to enter into a few challenges, and I want to share it with you.  Plus, I have an AWESOME giveaway for you (more on that later).  Here's my card:


I used the Lettering Delights Autumn-licious  SVG set for the owl, hat, and pumpkin.  I punched the border with my Martha Stewart branches punch.  The fun sentiments came from Pink By Design's Bountiful Blessings Stamp Set.   Here's the inside of the card:


I'm entering this card in these challenges:


Okay, now for the FANTASTIC giveaway.  Because I'm so thankful for you, my wonderful followers, I have some gift certificates to give away to some lucky commenters today. Compliments of Pink By Design, three lucky followers will win one of the following:

$10 gift certificate to Pink By Design
$15 gift certificate to Pink By Design
$25 gift certificate to Pink By Design

Here's what you need to do to have a chance to win:

1.  Be a follower of my blog.  Leave a comment letting me know...be sure to leave me your e-mail address.

That's it...BUT if you want EXTRA chances to win, you can:

2.  Like the Pink By Design Facebook Page.  Let them know that Lisa sent you.  Then, leave me a separate comment letting me know. (Be sure to leave me your e-mail address).

3.  Go to the Pink By Design Store, pick out a stamp set you'd like to buy with your gift certificate if you win, then come back here to let me know what you decided.  (Be sure to also leave me your e-mail address).

4.  Like my Facebook Page. Leave me a little message on Facebook, then come back here to leave a separate comment letting me know. (Be sure to leave me your e-mail address).

5.  Post about this giveaway on your blog and leave a link to the post in a separate comment. (Be sure to leave me your e-mail address).

So, you could enter yourself up to 5 times to win one of these wonderful gift certificates!!!  I'll be randomly choosing the winners on Wednesday, November 23.

Thanks for stopping by today!  Good luck!!!!!!!!


Sunday, November 13, 2011

Smile, It's Your Birthday

Happy Monday!  Today is my day to post for the Pink By Design Design Teamand I have a sweet little card that I made for my sister-in-law to share with you today.  She just LOVES ladybugs! 

But...you know what?  She is a fan of my Facebook page (which is great and very supportive of her), and I can't let her see a pic of her card before she gets it.  So, here's a pic for her to see on Facebook.  :)
Okay, so now that her card has been kept a secret from her, I can show it to you.  Here it is:


I used Pink By Design's Damask Background Stamp for the pink background paper.  I love how it adds just the right amount of elegance to my card. The sentiment came from Pink By Design's Take the Cake Stamp Set.  I got the cute little Ladybug from the Create a Critter Cricut Cartridge, the circle came from the Birthday Bash Cricut Cartridge, and the flowers came from the Close to My Heart Art Philosophy Cricut Cartridge.  Plus, I embossed the circle with my Candy Cane Stripe Cuttlebug Embossing Folder.

This was my first time using flowers like this on a project, so I want to show you how I made these flower cutouts into three-dimentional embellishments.  You'll see that I was learning as I went.  First, I cut all of the flowers in four different sizes: 1 extra large, 3 large, 2 medium, and 1 small, and I inked all of the pieces with my Colorbox Fluid Chalk Inks.  Then, I found something cylindrical to curl my petals around.  I used my i-Rock (don't worry, it's wasn't turned on) to curl the petals of the extra large flower.  You could use anything cylindrical you have on hand.

See, it makes the flat flower cutout stand out a bit more.

The i-Rock wouldn't work for the smaller flowers, though, because it was just too big around to put a nice curl in the petals.  So, I decided to use my Tweezer-Bees.  I just grasped the end of the petal in my tweezers and twirled it back, wrapping the petal around the tweezers.  It was a lot like I was using a curling iron to curl my hair.  :)

Next,  I punched a hole in the center of each of the flowers.  Here's where I learned a lesson...it would probably be best to punch the holes BEFORE I curled the petals (DUH!).  The punch flattened some of the petals out a little, and I had to recurl them.

Finally I put brads through the hole of each flower to join the layers together.  I adhered the flowers to my project using foam tape.


I hope you like my little card, and I REALLY hope my sister-in-law likes it.  Thanks for stopping by today.  I hope you'll leave a comment for me...I SO love to read them.  Have a wonderful day!


Thursday, November 10, 2011

Tacky Tuesday

OMGoodness!  Did you know that this month's Tacky Tuesday's Challenge involves using a frog cut????  How EXCITING!  In case you didn't know, the frog is my favorite animal.  I had froggies all over my classroom when I was teaching, and now I have them all over my craft room.  So, I HAD to make time to make a froggy card.  I also had to use a sentiment with the word "frog" or "toad" on the front.  Here's what I came up with:


I got this cute froggy from the Lettering Delights Toad-ally School Cut It set.  I replaced the apple, though, with a gift from the LD Birthday Fishes Cut It set.  I also got the hat from there.  If you'd like to see a tutorial about how I cut theses SVGs with my Silhouette Cameo using the Silhouette Studio Designer Edition, visit this post.  The sentiment came from combining a "Wishing you a Hoppy Day" stamp from Pink By Design's Hoppy Easter set with a "Toad-ily Yours" stamp from Pink By Design's Be Mine set using a masking technique.  It was really easy...if you'd like to know how I did it, just let me know in a comment, and I can put together a little tutorial for you.  

Anyway, I hope you like my little card.  I believe this challenge goes through November 15, if you'd like to join in.  Thanks for stopping by today!


Wednesday, November 9, 2011

Tutorial: Using SVGs with the Silhouette Cameo

Hey, everyone!  When I posted last week about my trying first day with my new Silhouette Cameo, I had a request to do a tutorial on how to use use it.  So, I thought I would show you how I use Lettering Delights SVGs with my Silhouette Cameo.

First, I need to let you know that I purchased the Silhouette Studio Designer Edition software so using SVG files with my Cameo would be easier.  As far as I know, Make-the-Cut (which I love), is not yet compatible with the Cameo, unless they've come out with an update in the past week or so that I don't know about (which is entirely possible).  I'm sure they are working on getting MTC fully functional with the Cameo.  I was itching to use my Cameo, though, and I really wanted to use the Lettering Delights SVGs that I just can't seem to stop collecting.  So, purchasing the Silhouette Studio Designer Edition for $50 was a no-brainer for me.  

I also want to say that I am, in no way, shape, or form, an expert at this.  I'm just sharing with you how I figured out to use my SVGs with this software.  There may be better, more efficient ways, but I'm just sharing my way. 

Okay, now on to the tutorial.  By the way, I'm working in Windows 7.

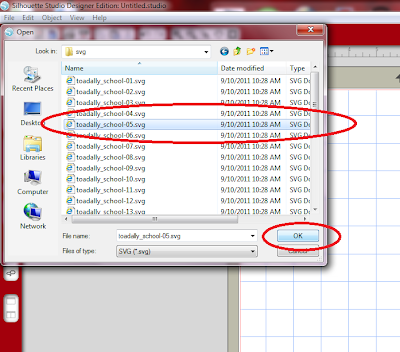
Step 1: Open the Silhouette Studio Designer Edition software on your computer.  Once it is open, go to File--Open in the upper left hand corner of your screen.  You can also click on the open folder in the upper left corner.

Step 2:  In the window that appears, change the "Files of Type" to SVG.  

Step 3:  Locate the SVG file you want on your computer, click on it, and click OK.


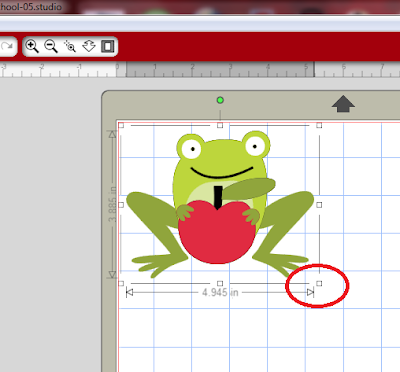
This is what your screen will look like if you just imported a Lettering Delights SVG file.  Other SVG files may be laid out differently on your screen and they may or may not be colored.

Step 4:  Now, you want to size the image.  First, click on the image to make it active. Measurements will appear around the image.

Then, Click on the lower right "handle" and drag until the image is the size you want.

Step 5:  Now, you'll need to break the image into its separate cuts.  Make sure the image is still active (with the measurements around it).  Then, in the lower left corner of your screen, click the "Ungroup Selected Shapes" button.

Your image should now look like this.  Notice that each little piece is surrounded by its own rectangle.

Step 6:  Now it's time to separate the cuts on your virtual mat.  First, click anywhere off of the image to deselect it.  Then, click on each individual piece and drag it to a new place on your mat.  The pieces will be grouped by color, which makes it easier for you! 

Step 7:  Now, you need to make these images cuttable.  First, you need to select all of your shapes to make them active.  You can do this by holding down the Ctrl key on your keyboard and typing A.  This selects all of the shapes.  You can also click and drag to select the entire mat.  You'll know the shapes are all selected and active because they will each by surrounded by a rectangle.
  

Step 8:  In the top right corner of your screen, you'll see a row of buttons.  When you let your cursor hover over each one, a short description of each button's function will appear.  Locate the "Open the Cut Style Window" button, and click on it.

On the right side of your screen, you'll see that "No Cut" is highlighted.  You want "Cut Edge" to be highlighted, so click on it.  You'll see a red outline appear around your images. If this photo is too small, just click on it to see it larger.

Step 9:  Now it's time to prepare to cut!  Yay!  Cut the desired colored cardstock for your cuts to the appropriate size.  You can use the grid marks on your Silhouette mat to help you with that.  Also, remember that the mat loads from the top of your workspace, not the left like on the Cricut (if you're familiar with the Gypsy).  

Step 10:  Connect your Cameo to your computer with the provided USB cable, and turn on your machine.  Load the mat into your machine (you can find instructions on how to do that in the guide that came with your machine).  

Step 11:  Now, click on the "Send to Silhouette" button in the upper left hand corner of your screen. If this photo is too small, just click on it to see it larger.

You will see that the sidebar on the right of your screen brings up the "Send to Silhouette" dialog box.  You'll want to double check your cut settings, so click on the "Cut Settings" link. If this photo is too small, just click on it to see it larger.

Choose the type of paper you are using from the menu.  (Click on the photo to make it larger).  I chose cardstock, since that's is what I'm using.  The software will now suggest what setting you should set your blade to.  I would recommend not paying too much attention to this.  I tried cutting cardstock with my blade set at 3, and it only cut through the thinner pieces.  

In fact, the user guide that comes with the Cameo gives different settings.  If this photo is too small, just click on it to see it larger.  You see...I AM using textured cardstock (from Bazzill and American Crafts), so I should be using a setting from 4-6.  I decided to use 5.

If you don't know how to adjust your blade setting, there are great instruction in your user guide:

You can also adjust Speed and Thickness on this screen, but I didn't bother with that just today. Once you have your cut settings like you want them, click "Send to Silhouette" at the bottom of the screen.

Step 12:  Finally, it's time to cut!  To do that, you just have to click on "Cut Page".  Then, the magic begins!

And here's how beautifully my Cameo (with its blade set at 5) cut through my Bazzill and American Crafts textured cardstock.  Just LOVELY!

Well, I hope you found my little tutorial helpful.   I know that seems like a lot of steps, but I just wanted to give as much detail as possible to make this easier for you.  And, really, once you try this a couple of times, it will seem so easy peasy!  I'll be sharing the card I made with all of these cuts a little later in the week, so check back to see it!

Thanks so much for stopping by today!