Hey, everyone! When I posted last week about my trying first day with my new Silhouette Cameo, I had a request to do a tutorial on how to use use it. So, I thought I would show you how I use
Lettering Delights SVGs with my Silhouette Cameo.
First, I need to let you know that I purchased the
Silhouette Studio Designer Edition software so using SVG files with my Cameo would be easier. As far as I know, Make-the-Cut (which I love), is not yet compatible with the Cameo, unless they've come out with an update in the past week or so that I don't know about (which is entirely possible). I'm sure they are working on getting MTC fully functional with the Cameo. I was itching to use my Cameo, though, and I really wanted to use the
Lettering Delights SVGs that I just can't seem to stop collecting. So, purchasing the
Silhouette Studio Designer Edition for $50 was a no-brainer for me.
I also want to say that I am, in no way, shape, or form, an expert at this. I'm just sharing with you how I figured out to use my SVGs with this software. There may be better, more efficient ways, but I'm just sharing my way.
Okay, now on to the tutorial. By the way, I'm working in Windows 7.
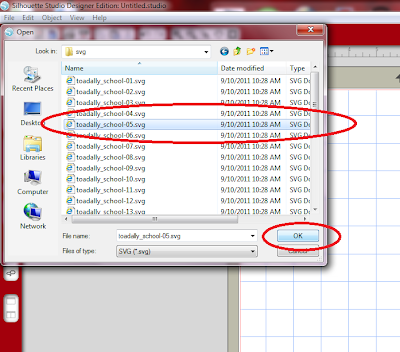
Step 1: Open the Silhouette Studio Designer Edition software on your computer. Once it is open, go to File--Open in the upper left hand corner of your screen. You can also click on the open folder in the upper left corner.
Step 2: In the window that appears, change the "Files of Type" to SVG.
Step 3: Locate the SVG file you want on your computer, click on it, and click OK.
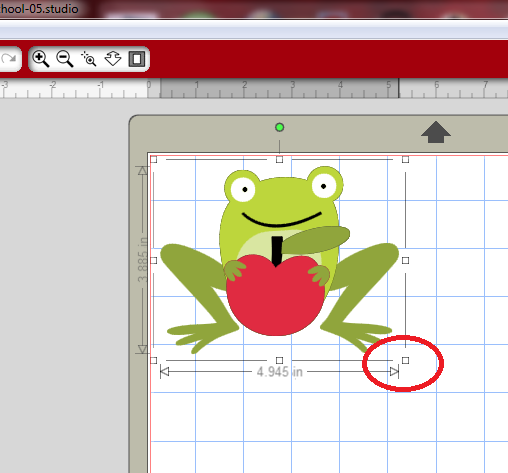
This is what your screen will look like if you just imported a
Lettering Delights SVG file. Other SVG files may be laid out differently on your screen and they may or may not be colored.
Step 4: Now, you want to size the image. First, click on the image to make it active. Measurements will appear around the image.
Then, Click on the lower right "handle" and drag until the image is the size you want.
Step 5: Now, you'll need to break the image into its separate cuts. Make sure the image is still active (with the measurements around it). Then, in the lower left corner of your screen, click the "Ungroup Selected Shapes" button.
Your image should now look like this. Notice that each little piece is surrounded by its own rectangle.
Step 6: Now it's time to separate the cuts on your virtual mat. First, click anywhere off of the image to deselect it. Then, click on each individual piece and drag it to a new place on your mat. The pieces will be grouped by color, which makes it easier for you!
Step 7: Now, you need to make these images cuttable. First, you need to select all of your shapes to make them active. You can do this by holding down the Ctrl key on your keyboard and typing A. This selects all of the shapes. You can also click and drag to select the entire mat. You'll know the shapes are all selected and active because they will each by surrounded by a rectangle.
Step 8: In the top right corner of your screen, you'll see a row of buttons. When you let your cursor hover over each one, a short description of each button's function will appear. Locate the "Open the Cut Style Window" button, and click on it.
On the right side of your screen, you'll see that "No Cut" is highlighted. You want "Cut Edge" to be highlighted, so click on it. You'll see a red outline appear around your images. If this photo is too small, just click on it to see it larger.
Step 9: Now it's time to prepare to cut! Yay! Cut the desired colored cardstock for your cuts to the appropriate size. You can use the grid marks on your Silhouette mat to help you with that. Also, remember that the mat loads from the top of your workspace, not the left like on the Cricut (if you're familiar with the Gypsy).
Step 10: Connect your Cameo to your computer with the provided USB cable, and turn on your machine. Load the mat into your machine (you can find instructions on how to do that in the guide that came with your machine).
Step 11: Now, click on the "Send to Silhouette" button in the upper left hand corner of your screen. If this photo is too small, just click on it to see it larger.
You will see that the sidebar on the right of your screen brings up the "Send to Silhouette" dialog box. You'll want to double check your cut settings, so click on the "Cut Settings" link. If this photo is too small, just click on it to see it larger.
Choose the type of paper you are using from the menu. (Click on the photo to make it larger). I chose cardstock, since that's is what I'm using. The software will now suggest what setting you should set your blade to. I would recommend not paying too much attention to this. I tried cutting cardstock with my blade set at 3, and it only cut through the thinner pieces.
In fact, the user guide that comes with the Cameo gives different settings. If this photo is too small, just click on it to see it larger. You see...I AM using textured cardstock (from Bazzill and American Crafts), so I should be using a setting from 4-6. I decided to use 5.
If you don't know how to adjust your blade setting, there are great instruction in your user guide:
You can also adjust Speed and Thickness on this screen, but I didn't bother with that just today. Once you have your cut settings like you want them, click "Send to Silhouette" at the bottom of the screen.
Step 12: Finally, it's time to cut! To do that, you just have to click on "Cut Page". Then, the magic begins!
And here's how beautifully my Cameo (with its blade set at 5) cut through my Bazzill and American Crafts textured cardstock. Just LOVELY!
Well, I hope you found my little tutorial helpful. I know that seems like a lot of steps, but I just wanted to give as much detail as possible to make this easier for you. And, really, once you try this a couple of times, it will seem so easy peasy! I'll be sharing the card I made with all of these cuts a little later in the week, so check back to see it!
Thanks so much for stopping by today!